Wednesday, August 31, 2011

Last day before "100 in 100"-Prepare and Repair

I am sure you are all shaking in your boots. This is going to be hard, but AWESOME! If you are like me or any of the other girls I know, the not shopping rule is going to be the hardest part!! Haha. Cracks me up, I thought I was the only one thinking about that, but apparently everyone is getting their last minute shopping in! To each her own I guess : )


Anyways, the last thing to do before the challenge tomorrow....rush out and buy a few last minute pairs of awesome shoes!!


These are actually a lot more versatile than you might think! There are just so many options when you have these babies! You were probably thinking a pair of Jimmy Choo's right? Lame. Just don't be gettin' all jealous on me because my shoes are more awesome than yours. 

Anyways, the LAST thing to do before the challenge (and it's not shoe shopping!) is to deal with that pile of "things" you set aside when cleaning your closet. I had a few tears or holes in shirts, a lot of broken and tarnished jewelry and a belt that needed fixing. 


Pretty much anything can be fixed with a glue gun or super glue, so glue those jewels back in if they have fallen out. Use small needle nose pliers to re-attach earring loops back on or fix necklaces (James is getting professional at this!) Crack out your needle and thread (or go get yourself a little dollar store kit if you need to) and sew up any small things or holes that need fixing. 

If you have tarnished silver jewelry, line a casserole dish or bowl with foil and boil some water. Sprinkle the dish (be generous) with both baking soda and salt. Put your jewelry in, making sure it is touching the foil,  then pour boiling water over top. The reaction causes the baking soda to bubble up and produces a lovely smell that will bring back memories of high school chemistry class. : ) It should remove all of the tarnish but use a toothbrush to scrub it if you need to, and then rinse well. It's like magic!

So are you all ready? Jewelry and clothes repaired? A clean and organized closet? Clothes tags? REMINDER ON DEBIT AND CREDIT CARDS? : ) 

Tomorrow to kick off the challenge and hopefully give some inspiration,  I will be posting

  23 Outfits. 1 Dress. 


Don't forget to post your outfit of the day tomorrow on our Facebook Group! Can't wait to see everyone!

xo

Tuesday, August 30, 2011

1 more day til we start the "100 in 100" challenge!

Hi All!  Here is what I have been working on today in preparation for the 100 in 100 challenge:


Day of the week tags!

I can already hear you saying "What the wretch are day of the week tags?! This idea stemmed from the lack of morning inspiration I often have when it comes to getting dressed....

*Stands there shivering in a towel*

*Surveys closet*

*sleepy +  no coffee*

*defeating feeling of nothing to wear. again.*

Yeah that is how most mornings go down. SO I thought it would be a great idea to make an outfit tag for each day of the week. This would be especially helpful I think for those who have to get out the door in record time and at an early hour, or those who have children crying and hanging off them and don't have time to even THINK about putting together a cool outfit, let alone getting dressed. This is for you.


Make some cute little tags out of whatever you have around...mine happened to be out of the pieces of "leather" I had leftover from covering my chairs. You can make them as fancy or as simple as you like! Make a tag for each day of the week. I chose to just make tags for Monday to Friday, but you can plan the weekend too if you'd like. Glue a ribbon around the top of each tag, leaving enough length that you can easily loop it over a hanger.

My plan and suggestion for you would be to spend some time Sunday evening to prepare for the week....put some music on, grab a cup of tea and head to your closet for some outfit planning! Go through each day (it might be helpful to look at the calendar first so you know what to prepare for)  and pick out your outfit of the day. Put everything on one hanger...shirt, pants, jewelery, tights, whatever you need for that day. It will make it SO much easier and quicker to get dressed in the morning when you don't have to think about what to put with what, and what fits, and what jewelry to wear with it. Just grab your hanger (and underwear I guess? yikes) for the day and get dressed!


It also forces you to use more of the items you have in your closet. If you have a sweater on your Monday hanger, it will force you to use a different one for Wednesdays outfit, getting more wear and more options out of your closet. It is perfectly fine to use the same sweater and just hang it on the Wednesday hanger when you take it off monday, however for me specifically I notice I often gravitate to the same clothes most days, so this helps me to wear ALL of my wardrobe.

There is no point of it taking up space if you will never wear it!! Hopefully by the end of this challenge you will be able to better evaluate what you do and don't use. And who knows? the things that you never wear now could end up being your favourite pieces in the end! You will shock yourself at how many options you can actually come up with. : )


 Happy tag making!

Sarah

PS. For all who are joining the challenge (or for those who want to see our outfit pics) I created a 100 outfits in 100 days facebook page. You can upload your photos of the day and post them there! http://www.facebook.com/groups/189750617758833/


Thursday, August 25, 2011

Quinoa Veggie Burger

Photo
photo from chatelaine.com
 
This is the newest recipe I've been enjoying, the quinoa veggie burger, and it's a favorite for sure. SO delicious! I love eating vegetarian, and James love his meat, so we try to compromise and meet somewhere in the middle. I was really excited about this quinoa (pronounced keen wah) burger. I'll admit though, not that I eat many veggies burgers (or burgers ) but I expected it to be kind of burger-ish, since it has the word  "burger" in the title. If I was going to be honest though, it's not. SO YUMMY, don't get me wrong, but James and I decided they are better called veggie patties. It's less decieving that way ; )

DSC_0290
red and white quinoa

These veggie patties are so amazing and so good for you. Quinoa is really a super food and is full of phytonutrients, antioxidants and can even help balance your blood sugar and help lose weight.  It actually cooks and tastes like a grain (it's kind of nutty in flavor), making it an excellent replacement for grains that are difficult to digest or feed candida. It's gluten-free as well. Here are just some of the amazing health and nutritional benefits:
  • Complete protein. Quinoa contains all 9 essential amino acids that are required by the body as building blocks for muscles.
  • Magnesium helps relax your muscles and blood vessels and effects blood pressure. Quinoa contains high levels of this vital nutrient.
  • Fiber. Quinoa is a wonderful way to ensure that you consume valuable fiber that eases elimination and tones your colon.
  • Manganese and copper. Quinoa is a good source of these minerals that act as antioxidants in your body to get rid of dangerous cancer and disease-causing substances.
Compared to other grains, quinoa is higher in calcium, phosphorus, magnesium, potassium, iron, copper, manganese, and zinc than wheat, barley, or corn.
Studies have shown that quinoa has documented health benefits too! Quinoa, in its whole grain form, may be effective in preventing and treating these conditions:
  • Artherosclerosis
  • Breast cancer
  • Diabetes
  • Insulin resistance

File:Chenopodium quinoa in flower.jpg
this is how quinoa grows, isn't is beautiful?
 from http://flickr.com/photo/60364452@N00/3018416303

So anyways, those are just a few of the great things about this grain. Back to the recipe! You can find quinoa in almost any bulk or health food store these days, we often find it on sale at Loblaws or Zehrs. This recipe is a satisfying, filling dinner and is even better the next day! We often double the recipe and freeze some of the patties for quick, easy and healthy dinners.

Quinoa Veggie "Patties"
adapted from Chatelaine
  • 3/4 cup uncooked quinoa (about 2 cups cooked)
  • 1 tsp grapeseend or olive oil
  • cremini mushrooms or any other mushrooms, coarsely grated (1 cup)
  • 1 cup coarsely grated zucchini
  • 3/4 cup coarsely grated carrot
  • 1 onion, minced
  • 1 garlic clove, minced
  • 1 egg, beaten
  • 3 tbsp cornstarch (or oatmeal)
  • 1/8 tsp cayenne pepper
  • one vegetable stock or chicken stock cube
Cook quinoa according to package directions, adding stock cube, about 14 min or until all water is absorbed. Do not over cook! Transfer to a large bowl.
  1. Heat a large, wide non-stick frying pan over medium. Add oil, then mushrooms, zucchini, carrot, onion and garlic. Cook until soft, about 5 min. Add to quinoa. Stir in egg, cornstarch and cayenne.
  2. Heat the same non-stick frying pan over medium. Firmly press quinoa mixture into a 1/2-cup measuring cup. Turn and release into pan. Gently press to shape into a patty about 4 in. wide. Repeat, cooking 2 patties at a time. Cook until golden and warmed through, about 4 min per side. Top with tahini sauce and roasted plum tomatoes.
  • Portobello “Bun”:

    Barbecue portobellos on a greased grill over medium for 5 min per side.
  • 159 calories
  • 5 g protein
  • 27 g carbohydrates
  • 4 g fat
  • 3 g fibre
  • 180 mg sodium
James usually eats his with a bun and I eat mine with a portbello. Make SURE you use the tahini sauce!! I was a little unsure about it at first but it really just takes it to the next level. The favors togethter are so amazing. These burgers are a great base and fairly flexible as to what ingredients you add. I had more carrots that zucchini, so I just evened out the amounts. Needed to use up some green onions, so I tossed those in as well. Didn't quite have enough quinoa, so I substituted the rest with couscous. VERY adaptable! If it's too moist (it should be very moist anyways) add more cornstarch. Not sticking? just add another egg.

This is such a fanastic recipe! Try it topped with roasted red peppers and chipotle sauce. MMMM. Enjoy your delicious meat free meal. You won't even miss it! (in the words of meat-loving James) : )

Wednesday, August 24, 2011

Preparing for the "100 in 100" challenge

This challenge is going to be SO hardcore you are going to need to start preparing immediately!!! Haha, kidding. I have been thinking and getting excited about the challenge though, and to make this challenge as successful AND enjoyable as possible, I think we need to prepare a bit.

I know this is scary, but take a goooood look at your closet, or in my case step into my closet.


Woman Surveying Her Messy Closet
(from corbis images)


 Maybe I am just the only one, but sometimes stepping into my closet can be a little scary for fear it might implode on me (yes it's that full of every thing imaginable) or that I might just get lost in the abyss. We live in a really small house with few closets, so our walk-in closet is our saving grace as far as storage goes. So though it is fairly organized, it can easily get out of control.

Step ONE: Survey your closet. Is it disorganized? Messy? Full of stuff that doesn't even belong there? Things falling all over the place? All of the above? haha. Now is a great time to clean it up, organize and go through your things. This challenge and getting ready in the morning will be so much more enjoyable if you can find things and are not concerned for your life everytime you open the door.  Start by organizing like things together, a basket for all purses, all pants together, blazers together etc.


Linen Closet Organizing -- Martha Stewart
Only Martha...but I can't help but swoon over this beauifully organized linen closet.

Step TWO: As you go through things, set aside things that are garbage, need repair, need to be ironed, don't fit or things that you HATE. Now normally I am big on purging things, but I think for this challenge it should be done AFTER the 100 days. My logic is this:  there have been many pieces that I hardly wear, are a bit too big, are frumpy or don't really know what to do with. Well, that is the beauty of this challenge! As I was playing around with outfits you wouldn't believe how many things I pulled out of my "get rid of bag" because I would think "oh, if only I had something like..." So unless it's something you absolutely hate, save it for now.

Step THREE: Accessories. I love them. I feel like I can never have enough earrings or bangles! And since I actually wear them all, I feel ok about that ;  ) Accessories truly can make an outfit. And at the rate I pile them on, they are pretty much THE outfit! I won't lie though, right now they are scattered, falling, broken, tarnished and just plain messy. So go through EVERYTHING. Put anything broken or tarnished in a pile, we will deal with that later. There are some really great jewelry storage ideas here http://tipnut.com/jewelry-organizers/ make it pretty so you will be excited to get dressed in the morning! Practical can still be pretty : ) Wouldn't that make you smile every morning when you see your jewelry all organized in the pretty tea cups your grandma left you? Well it's better than waiting for the tea party you will never have!

an ice cube tray? is this not a genius idea?
Stylish Jewelry Storage
vintage tea cups, so pretty!


Also, organize all of your purses, belts, scarves and shoes. Again putting aside anything that needs to be repaired or spruced up. That will be something else we will work on later, after we're finish cleaning!

Step FOUR: As you go through your closet, make a list of the things you think you need. The key word in that sentence is THINK! If you truly think you need it, or think it will really stretch your wardrobe and give you a million more options, write it down. For me it would be a red blazer and and fur vest, They would be so fun and go with a million things! Try to do your best to keep the list to a minimum.


See? look how awesome the vest looks with that?!

Step FIVE:  You should have a pile of stuff that need sprucing up or repairing, so just set it aside for now. Time to relax and have a cup of tea, you deserve a break! So while you are relaxing with your cup of tea and feeling extremely accomplished by your beautifully organized closet, move onto step five. This step is probably the HARDEST of all. Mentally prepare yourself and commit to not buying any clothes for 100 days. Or as long as you are committed to this challenge. If you only think you can do 50 days (stretch yourself though!!) then that is super awesome too. The point is not how long, but to make the most of everything we have, find new and creative ways to wear things and most of all to realize and appreciate how much we do have. So just to remind yourself, write on a little fortune cookie size piece of paper " I commit to NO CLOTHES" and tape it to your debit and credit cards!! Seriously, do it!


Whew, that was exhausting! Are you excited though? I hope you will join in this challenge with me and get ready for starting on Sept. 1st!! I will give you a few days to get that closet of yours under control before we move on to the next prep step! More to come : )

Side note: some people are apparently having trouble posting comments. You do not need an account to post a comment. Click on the post for that day and at the bottom of the page there will be a comment section. It says "post a comment" so write in there, and then below that it says comment as and a box that says select profile. You should be able to click and it will give you options. Click name and post your name, the URL line below is for if you have a blog, if not then leave it blank. I hope that helps! Please post a comment so I know it's working! We want to know who is joining the challenge with us! : )


Tuesday, August 23, 2011

High Protein, Low-Fat Basil Pesto

I have decided that pesto is just one of those things you either love or hate, there's no in between. It's such a gourmet addition to any meal and is so versatile, you can use it in as many way as your imagination can come up with! I happen to love it, but buying it can be fairly expensive (well at the rate I spoon it onto things!) and is always loaded with tons of fat and salt. Both of which I love. Both of which aren't the best for you. Of course...like most other delicious things in life.


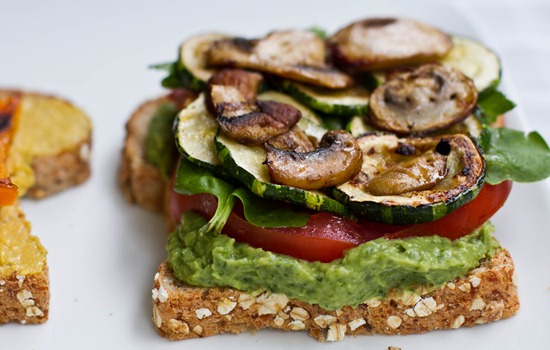
IMG_9472
picture and pesto recipe adapted from Oh She Glows http://www.ohsheglows.com/

A typical Pesto recipe in made of up lots of basil, pine nuts and lots of olive oil, usually a cup or so. Even though olive oil is a healthy fat, it is still a fat and needs to be eaten in moderation. I adore pesto on anything, so the thought of comsuming that MUCH olive oil in one sitting (yes I can go through a batch in one sitting) kind of scares me. I would have to run for hours to work that all off....and I avoid running at all costs...so I needed to find a better alternative! : p I happened to stumble across an awesome pesto recipe that was not made with oil on one of my favorite blogs, Oh She Glows. It's made with navy or kidney beans instead of oil, which give it a nice creamy consistancy. I revamped the recipe a little to taste a bit more like a traditional pesto recipe, and added a bit of olive oil for flavor and healthy fat. If your basil crop is quickly growing out of control, this is a recipe you need to try!

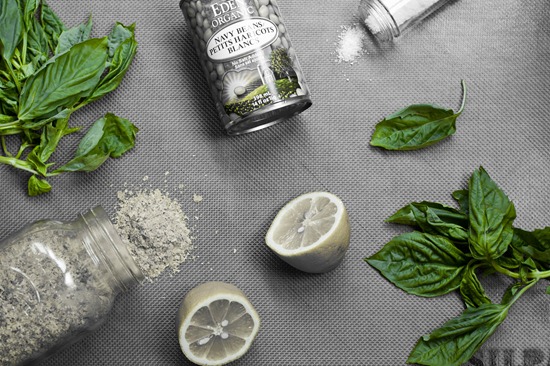
IMG_9454-2
the fresh ingredients you need


High Protein Basil Pesto

The beans replace the typical cup of oil in this pesto recipe, making it not only low-fat, but high in protein as well. There is a whopping 15 g of protein and 11 g fibre in a cup ! Enjoy this pesto spread on sandwiches, pasta, or even use for a dip for vegetables or chips.

Yield: 1.5 cups (see below for nutritional info)
Ingredients:
  • 1 cup tightly packed fresh basil leaves (don’t be shy- really pack it in!)
  • 4 garlic cloves (or more to taste)
  • 1 15-oz can navy/white kidney beans (1.5 cups)
  • 1 tbsp water
  • 2-3 tbsp fresh lemon juice (1/2 lemon) I used 3 tbsp
  • 1/2-3/4 tsp kosher salt ( more or less depending if there is added salt in your canned beans)
  • 2 tbsp cold pressed olive oil (to make it completely oil free leave out of course)
  • fresh ground pepper to taste

Directions: Add garlic clove to processor and process until finely chopped. Now add in the rest of the ingredients to taste and process until smooth, scraping down the bowl as necessary.

Nutritional Info: (per 2 tbsp): 41 kcals, 0 grams fat, 3 grams protein, 3 grams fibre, 0 grams sugar, 7 grams carbs.


Now go enjoy this on anything and everything! One of my favorite ways is tossed with pasta and some tomatoes and parmesan cheese or goat cheese. MMMM! Great on burgers (or veggie burgers for me) as well. This makes a fairly decent batch of pesto so I decided to freeze mine in ice cube tray and pop out a few when needed. Perfect for eating fresh, local pesto year round!

Love and green, garlicy goodness to you!

Sarah

PS. there will be more on the "100 in 100" challenge tomorrow...things to think about, get ready and prepare for an awesome 100 days of awesome outfits! Stay tuned!

Monday, August 22, 2011

The "100 in 100 challenge" aka Closet Appreciation Challenge

See, she doesn't have any clothes to wear either! riiiight....
 Ever sleepily stumble into your closet in the morning and think "I have NOTHING to wear", despite the fact that you have mountains of laundry, shelves that are overflowing and a clothes rod that sags in the middle? Yet still, there is nothing inspiring and nothing to wear.  *Sigh*  Too tight, too short, too big, too scratchy, too worn, needs fixing, too ugly. NOTHING TO WEAR! Then, after all that hemming and hawing you resort to a) yoga pants (nothing says "I tried today" like yoga pants!) or b) one of the outfit "uniforms" you always gravitate to. What? that never happens to you?! Oh....it's probably just me. ; )
Declutter wardrobe, declutter clothes, declutter closet, unclutter life, ways to handle messy wardrobe, ways to declutered wardrobe, confused wardrobe, confused closet, tips handling neat closet, tips of clear closet, tips to handle clear wardrobe, shopping tips, managing wardrobe, managing closet
Lately I have been thinking a lot about contentment, what it means to live with the attitude of gratitude and how I can cultivate a grateful heart. We're SO abundantly blessed, but yet most of us feel like we are always lacking...never satisfied, always needing more. While I was standing discontented, looking at my nothing-to-wear  closet a while ago, a song came to my mind "Give Thanks with a Grateful Heart ". It's ok, you can laugh... I did! But I was reminded in that moment just HOW MUCH I have. My wardrobe isn't the most beautiful, awesome, extensive, expensive one, but I AM BLESSED. I have a ton of clothes, even if they aren't the ones I feel like wearing right now. And I bet you do too, even if you feel like you have nothing to wear! So this is where "Operation Closet Appreciation" was inspired. And THEN I saw this awesomeness

Created by Butler, Shine, Stern & Partners, the 'Let's Get Dressed' campaign is Piperlime's largest to date.

I laughed so hard when I saw Piperline and the Gap's new advertising. It may have resonated with me a little *wink* I know I can't be the only one out there, they didn't start this ad campaign just because they saw ME in sweatpants! Now before y'all get your sweat pants in a knot, let me just say I think they are just fine sometimes, in the right place or on occasion....but honestly...really...do you feel your BEST in sweatpants? Like you look attractive. feel good about yourself and are ready to face the day? I doubt it...but if you do and you love it, then you just rock on with your trackpanty self! 
But for those of you who do not fall into that category, need a change and have nothing to wear (you KNOW who you are!) I am issuing a challenge. "Oooo, a challenge!" Yep, I KNOW you're up for it! Starting September 1st,  myself, along with my sister and few friends are going to be doing the "100 in 100" challenge. 100 days, 100 different outfits. We are going to attempt to create a different outfit everyday, using what we ALREADY own. Before you go thinking I have an insane amount of clothes, I don't. See?


Kidding, kidding! I wish, but it's not my closet. I would say I fall somewhere in the middle. I definitely don't have a ton, so it is actually going to be a quite a challenge. We want as many as we can get to join in this challenge with us. So rally your friends, it's going to be fun! We're really excited about it and will be posting our most interesting (yeah, you may just see me at the grocery store in my wedding gown and leather jacket by day 80)  inspiring (and maybe ghetto, haha) outfits of the day! You may think there is no way you can do 100 outfits (I'll admit, it's a little daunting) but I guarantee you have a ton more than you think! I read a statistic that said most people only wear 20% of their wardrobe. Shocking, but probably true if you look at what you actually do wear. So if you can't do 100, evaluate your closet and how many outfits you think you can make. Then double it. Come on, you can do it!!

The rules : Use what you have, buy nothing, experiment and try new and creative ways of wearing the things you have in your closet. I promise you, by the end of this challenge you will have SO many more outfits and begin to appreciate how many things you actually DO have to wear. Your bursting closet and bank account will thank you, I promise.  Not to mention you'll feel so much better about yourself for looking nice and put together and not wearing sweatpants!

from Atlantic-Pacific.

So what do you think? Are you in?? I know you can do it!!
If you want to join us, post your challenge ie: "I'm doing 100 in 100" or "I'm doing 25 in 25" or "50 in 50" in the comment section below.


 Let's inspire beautiful! Beautiful outfits and beautiful, grateful hearts : )


Stay tuned, more to come!

Sunday, August 21, 2011

Homemade Salt & Vinegar Chips

There pretty much isn't anything I love more than a good bag of Salt and Vinegar Chips. I can polish off a huge bag of Miss Vickies single handedly in a sitting, no problem! Except it gets to be a major problem when I do it all the time (which I don't, but there was a time!) So the only remedy that works is to just not have them in the house. James will buy them and then eat 5 and put them away....but I know they're there. I can hear them calling... even in the middle of the night, haha. I just can not resist!!

 So I just try not to have them because if I have one, I have the bag. Sad but true. So yesterday was a particularly AWESOME day when I discovered Martha Stewart's home made BAKED Salt and Vinegar chips. I have tried to make some before without a recipe, but they just never got vinegar-y enough. These ones....A-M-A-Z-I-N-G!! I was serious giddy about them!
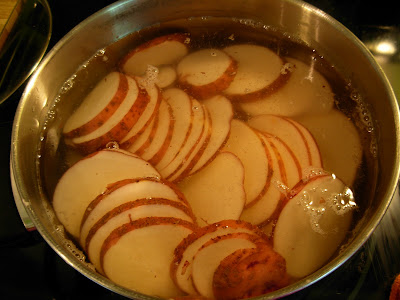
They are simmered in vinegar first so they are saturated with S and V flavored goodness. MMM!


sliced and boiling in the vingar
 
Ingredients
  • 1 pound potatoes (I used red ones) into 1/4-inch-thick slices
  • 2 cups white vinegar (I used pickling vinegar to get it even more sour! so good)
  • 1-2 tablespoons extra-virgin olive oil
  • 1 1/2 teaspoons coarse salt, plus more for sprinkling
  • 1/4 teaspoon freshly ground pepper

Directions

  1. Bring potatoes and vinegar to a boil in a medium saucepan (vinegar should cover potatoes). Reduce heat to medium-low, and simmer potatoes until just fork tender, about 5 minutes. Let potatoes cool in vinegar for 30 minutes. Drain well, and gently toss with oil, salt, and pepper.
  2. So here you have 2 options, you can bake them OR you can grill them a la martha stewart.
Oven: Bake at 425 degrees for 35 mins, then flip and bake for another 10-15. Be sure to watch them.    

Grill : Preheat grill to medium-high. Grill potatoes in a single layer until browned on both sides and cooked through, about 5 minutes per side. Sprinkle with salt before serving

Words can not describe my joy.

 YUM!!!!

They were amazing and a VERY satisfying alternative to Miss Vickies. I tried to save some for James.. I really did...but by the time he got home there were none left. He was gone way too long. See? even these I can't resist! But atleast they are heathy!

Give them a try! Your tummy will be satisfied and your house will smell like the inside of a S&V chip bag! : )

Saturday, August 20, 2011

Gotta cover my seat yo!


So here's one of my latest projects! Well to be honest, there are always about 6 on the go at any given time, but I'm actually finished this one! I am pretty sure I can hear the angels (and James!) rejoicing. So the picture above are chairs (there are actually 8 of them) that are from our kitchen table set. It was another Kijiji steal we snagged some time last year. I was serious when I told you we have literally  furnished our entire place thanks to Kijiji!! The table set was such a sweet deal.  It was only a few years old, solid wood, bar height, modern, in great condition AND it seats 8! We were pretty stoked because with both James and I having large families, we are always adding more seats....well we still need a lot more...but we are closer!

We sold the table and chairs we had for the same price they were bought for (my MIL got it at an auction for a killer price) so in the end we only paid $200 for it. Pretty sweet since new it would've set us back between $1,500 -$2000! The only NOT sweet thing was the seats. They look half decent in the picture above, but up close they look like this


No, those aren't marks on your computer screen...the seats are just that dirty...and they look worse in real life. Truthfully, they weren't really this bad until last weekend when we had our friends and family over helping us roof (we know how to host a paaarrrtay! haha) Roofing boys + dirty pants + not wipeable white cotton =  time to recover your seats!! I planned on it anyways (anticipating kids and white seats we can't wipe? what a joke) but after last weekend I decided I should do it sooner than later ; )

It made the world of a difference! It was a bit time consuming, but fairly simple for the most part. I was given a roll of black "leather" a while ago, so I decided to go with that since it was free, black and easy to wipe! 

The tools:


 So first was simply unscrewing the seats from the chair frame,then flipping it upside down on top of the fabric, good side facing out.


Following the shape of the chair seat, cut around leaving about a 1-2in border, depending on how thick the seat is. It's basically like wrapping a present, just a little more tedious! I think it might have been easier had my fabric been cotton or something thin, but since I like to do things the hard way....yeah, it was really thick and really hard to work with. So in the effort to make the corner folds as perfect and as tight as possible, I cut almost an L shape to remove some of the bulk


Definitely try folding it a few times to be sure exactly where and how much you need to cut BEFORE you cut! I started off by doing one staple on one side of the seat, pulling the fabric tight and then stapling directly across on the opposite side. I found this the easiest way to do it. It holds the fabric tight in place and then you can work your way around the seat from there. So after a few hours (ok, a bit more than a few) a couple thousand staples, 8 chairs and fabric that fought me the whole way (did I mention choose THIN fabric!) I finished with a bunch of these


 And after installing the seats back on the chairs, I was left with this


Much better! I had to get over my perfectionist ways and just deal with the fact that there will be SOME wrinkles here and there around the corners...PICK.THIN.FABRIC. Unless I am taking a close up (forgive the not-so-awesome pics, I'm having camera troubles *sigh*), you don't notice it at all though. So now my kitchen chairs are clean and will stay that way thanks to the easy to wipe, black (take that kids with sharpies and art skills!!) fabric. James already tested them out with his salsa, and I am pleased to say they clean just fine : )

And just incase our kids end up being anything like I was (or my brothers) I saved enough fabric to recover 2 chairs if need be. You know, for when some awesome kid decides to slash a Z for zorro in them ; )

I like to THINK I am ahead of the game....but then kids are really sneaky like that...they'll somehow know I can cover the chair again, so they'll make sure they carve it in the wood instead. Haha, was that just my family or do you have kids like that too?


Thursday, August 11, 2011

No need to knead

Freshly Baked Country Loaf!

There are few things better than the smell of freshly baked bread...except maybe butter melting on top of a slice of freshly baked bread : ) While I love homemade bread, I've never really been a huge fan of bread makers. The loaf shape is weird, the hole in the middle from the paddle, the fact that the machine takes up so much essential real estate in the cupboard. To each his own,  I am just not a huge fan. I also am not a huge fan of slaving away for hours mixing, rising, kneading, rising etc. I mean, it's not that I mind the actual task, it's just that after all that time and work you are left with one loaf of bread, which then gets devoured within a matter of hours. Ever seen a homemade loaf of bread go moldy? Yeah. Probably about as many times as you've seen a kid beg to brush his teeth. It just doesn't happen! It gets scarfed back way too fast : ) 

So there was never a happier day then when my most amazing sister-in-love Gen, informed me about Chef Micheal's no knead City and Country bread. It has just a few ingredients, no oil (I hate when there is a ton of butter or oil in the bread) takes literally two minutes to mix up and THE BEST PART: you don't have to knead it! It's the best thing since....sliced bread? :) Sorry, I couldn't resist haha.

Lots of times I find "eating healthy" and preparing healthy meals from scratch fairly time consuming, so I am constantly on the look out for amazing, healthy and QUICK things to prepare. This loaf is very cost effective since it has very few ingredients and takes no time at all. It also freezes great, so I usually make a few loaves at a time, or freeze dough for another loaf after it rises. I make it before I go to bed, let it rise overnight and then bake it first thing in the morning. Here's the recipe:

For a loaf of Country Bread:
3 C all purpose flour or bread flour (bread flour has a nicer rise to it)
1 C whole wheat flour or bread flour
1/2 C of any multi-grain mix (anything to add up to 1/2 C, red river, oats, flax, cornmeal, hemp hearts etc)
1/2 tsp of active dry yeast (quick rise hasn't worked as well for me)
1 1/2 tsp of salt
2 1/4 C warm water

I always use 2 C whole wheat, 2 C white and we love it. I find when I do this though sometimes I need a bit more water (closer to 2 1/2 C), so just add a bit at a time until it is all incorporated and moist.
For a loaf of City Bread:

4 C all purpose or white bread flour
1/2 tsp active dry yeast
1 1/2 tsp of salt
2 1/4 C warm water


In a large bowl whisk the dry ingredients, evenly distributing the salt and yeast throughout the flour. Pour in the warm water and stir until moist dough forms. Continue stirring until the dough incorporates all the loose flour in the bowl, 1 or 2 mins total.

Cover bowl and let rise in a warm place for 18 hours (even 10 hours is great) The dough will double in size and bubble, and long elastic gluten strands will form without laborious kneading.  Knock the dough down and toss with a splash of oil, evenly coating the dough ball. 

pre-rise

Very important: grease AND flour the bread pan. You just might be eating it out of the pan otherwise! Form into a 9x5inch (2L) loaf pan and, without covering, rest it a second time. Time to make one of these ; )


ps. I discovered that Coconut Milk froths beautifully for lattes!

In 2 or 3 hours it will double in size once more.  Preheat your oven to 375 and bake for around 30 mins. Check to see if it is done, if it sounds "hollow" it is usually done. I have found there is no exact set time, I just check on it.

 I love that you can still make this bread when there is virtually nothing in the house-no eggs, milk or oil needed! It's definitely saved us on a few occasions. 
So there is your no knead bread! Now you can enjoy healthy, homemade bread that isn't laborious to make!

Smiled when I added the picture. Fitting- bread and bread of Life : )


Now go slather on a little butter and honey and have a piece before it's too late!!


Sarah xo


PS. the computer is going to the dr.'s today...so I will be taking little a hiatus : )


Wednesday, August 10, 2011

Kijiji and Baby Love--my latest project

She's not really a looker....but it's the quality that counts right? :)

 Anyone who knows me can attest to my love of finding, refinishing and revamping treasures. Pretty much anything-furniture, clothes, jewelry, you name it. If I can repaint or remake it, I will! Oh, and I do use the word "treasures" loosely because well, beauty is in the eye of the beholder right?  : ) Apparently it is something I have become known for because I can't count the times someone has said to me "you would be so proud of me or I pulled a 'Sarah' and snatched this off the side of the road, or found this at a garage sale, or remade this into THIS!" haha, I love it! I get a pretty good laugh out of the fact that I am becoming known for my junk findings : ) It's something I have always done, but I guess it is starting to catch on. Inspire beautiful baby!  

I have practically furnished our entire house thanks to things I have scored on Kijiji for amazing prices.  There are SO many great reasons to shop Kijiji instead of buying new: a) reusing = better for the earth and not in a landfill b) more affordable = easier on the bank account c) you can customize to your own tastes and colours d) unique one-of-a-kind finds e) usually better quality than you can purchase in the stores now. Convinced yet?  :)

So onto my latest project....the baby's room. Long story short, we aren't having a baby, we're adopting. James and I have been in the process for a while now...and will likely be for a while to come. We planned to adopt a baby boy in July, but in the end the mother changed her mind. So the baby's room is half finished, but when she changed her mind we obviously stopped everything. I decided a little while ago though, even if it is not happening yet, I know God is planning our child and WILL bring him...so I might as well just finish getting the room ready! I guess it keeps me hopeful and looking to the future. So the challenge with this room is that it's crazy small. Just enough room for a rocking chair, crib and some sort of cabinet along the wall for toys...and even that's tight! I planned on building one (and by "I" I mean James haha) since everything has to be very exact or it won't fit. This was what I was thinking and the inspiration for a toy/whatever else cupboard. Obviously the baskets would have to bigger though...

http://www.decorpad.com/photo.htm?photoId=426&index=21&currentPage=1&searchQuery=nursery&searchType=photos


Sorry, it won't let me post the picture but check out the link. Very cute. The problems: it could be expensive since wood isn't cheap AND James needs to find the time and motivation to build it. ; ) So oh happy day when I happened to stumble across this hall table on kijiji! Solid wood, the perfect measurements and $30? Yes please!! 
The before:


It's hard to see, but there is a lovely crackle thing happening on the top. It was...interesting. So interesting it just had to go. I used paint stripper and scrapped off the LAYERS of crackle paint (honestly why do they even make that stuff?!) then gave it a good sanding. The crib is an espresso colour, so in an effort to make things a little more cohesive, I decided to stain and match the top. I have used oil based stains and Polyshades in the past, and while they did a great job, the smell was SOOO strong it made us sick and lasted for months. After reading a lot about the dangers of VOC's, I'm pretty picky about the paints and stains I use, especially when it comes to the baby's room. So after much searching (who knew a water based stain was so hard to find?!) I finally found a good water based, low VOC stain.


It's a Saman stain (made in Canada, which is nice!) in Chocolate. I have to say, I was pretty impressed and definitely will use it again. It went on easily and had no horrible need-to-air-it-out-for-six-months kinda smell. After a few coats of stain, I sealed it with another 4 coats of Clear Coat (also water based) and then gave the shelf and legs a fresh coat of white paint. After letting it dry and adding some baskets that we already owned.....

The After:


....I have a quality, perfectly matched, perfectly sized, $30 toy shelf! Heck yeah!


What do you think?? Have you ever found an "inspiration photo" and then tried to do it yourself? I love seeing people's ideas and works of art!


Tuesday, August 9, 2011

Beautiful, Yummy Eats

This year James and I joined the local CSA (Community Supported Agriculture) program and we're really loving it! I would highly recommend it if you have one in your area,  it's such a win win. Support your local farmers and have fresh, just picked produce delivered every week. I feel so much more satisfied doing this knowing that it is supporting our local economy and that we are getting the nutrients we pay for. Maybe it's just me, but it always bothers me going to the grocery store and buying fruits and vegetables, (which can be quite expensive since we eat a lot) spending the extra money to eat healthy, but KNOWING that it has likely traveled for a few days, if not a week or two and has lost a huge chunk of it's nutritional value. Lots of money. Trying to eat healthy. Little nutrients. : ( I hate it. So it makes me love getting my local veggies even more!


We bought a "small share" which gives just enough organic produce for the two of us. It says it feeds four, but obviously we consume a lot more veggies than most because it is just perfect for us. I love the surprise of not knowing what will be in our box, it's always something different every week. It's a great thing because it challenges us to try new veggies (fava beans anyone??) and cook things we wouldn't normally. This week it was beets! Usually I juice them, but this week I thought I'd try something new.


Pasta with Beets, beet greens and Goat Cheese

I'll admit, I was a little bit skeptical. Beets in pasta? It sounded interesting though, and anything topped with goat cheese is amazing so what the heck. : )We ended up loving it! Different but very delicious! The recipe is from a cookbook called Simply Organic. I would highly recommend this book if you love eating locally or in season. This book is organized seasonally and has recipes for EVERYTHING to take you through the year as they are ready for harvest. I LOVE it! 

Here's the recipe:

2 bunches of beets with greens (about 8) we used 5 and thought it was perfect
1/2 C olive oil
2 med onions, thinly sliced
2 garlic cloves minced
3 Tbsp balsamic vinegar
2 Tbsp chopped fresh oregano
2 Tbsp chopped fresh rosemary
1 pound of whole wheat pasta
6 ounces soft goat cheese crumbled
3 ounces Parmesan Cheese grated
Salt and pepper to taste


Cut the greens off the beets, wash and coarsely chop. Wash and trim tops and bottoms of beets and put in a large pot. Cover with water and simmer for 20mins to 1 hr depending on the size of the beets. When the beets are cooked, remove, run under cool water using your hands to slip off the skins. Cut into bit sized wedges.
Bring another large pot of water to a boil for the pasta. I decided to go with this rye pasta, but use whatever your family likes. 


In a large skillet over medium heat, warm the olive oil and add the onion and the garlic. Cook for 5 mins or until soft. Add the vinegar, oregano and rosemary and cook for another min. Cook the pasta according to directions, adding the chopped beet greens during the last minute of cooking, drain. Add the beets and the onion mixture to the pot of pasta, tossing gently to mix. Season with salt and pepper to taste. Sprinkle with cheeses and top with ground pepper. Delish!!

Hope you enjoy it as much as we did! Now if you'll excuse me, I need to go scrub my beet stained counters...


Monday, August 8, 2011

A Delicious Morning Start....

I have forever been an avid coffee drinker.  Straight coffee, mocha's, lattes, anything, I just love the stuff! Starbucks to me is just a little heaven on earth. I always say to my husband, forget the diamonds, coffee = love. He and his wallet should be eternally grateful ; ) 


So needless to say, it was quite distressing when I started realizing that despite my love for coffee and lattes, that my body no longer did. Sad, sad day. I tried to fight it, but I would start to feel sick every time I drank a cup, so I needed to find an alternative. You know as well as I if you have tried alternatives, it is not pretty. Come on, rice milk and chicory root "latte"?! It's pretty much a sin to even stick the word "latte" in there! And it tastes about as good as it sounds. So anyways, I have been on the hunt forever for something satisfying and still "latte-ish" since my morning hemp shakes were really not hitting the spot.

*Enter Coconut Milk Mocha*


My new love.

Extremely satisfying and dairy and sugar free. Coconut milk is a new discovery for me and I'm obsessed now. I have been drinking almond milk for a year or so, and I do like it, but to put it in coffee or make a latte with it is like just adding water. No good. The coconut milk on the other hand is suuuper creamy and delicious, and has the consistency of cream (with out the side effects!)


Here's the recipe, you can play around with the amounts but this is what I have found I liked the best

3/4 cup or so coconut milk
1/4-1/2 cup water
1 tbsp carob or cocoa
10 drops stevia (sweeten to taste)
1-2 tbsp espresso ground beans
a little dash of vanilla
Directions:

Place all ingredients into a small pot on stove top and bring to medium heat for a few minutes til warm/hot, but not boiling.
Then drain all the ingredients (to get rid of coffee grinds) through a small colander or tea strainer (or something similar) and pour drink into a mug to enjoy!
Now the ground espresso beans are optional, I added it in to give the drink more flavorful and a little extra kick, but if you can't handle caffeine try decaf espresso OR just leave it out and make it a hot cocoa. 

This seems to go over well for me. Espresso, despite it's strong flavor actually has less caffeine than a cup of coffee does. So if you are trying to watch your caffeine intake, this is a pretty good compromise. It has a little bit of kick but not the same amount of caffeine as a cuppa joe.

So there is my new delicious way to start the morning! A satisfying dairy free, sugar free, gluten free (and maybe decaf if you choose) drink! 

Anyone else trying to kick the coffee habit or go dairy or gluten free? Have you found anything that works for you AND is deliciously satisfying? Tricky combo isn't it :)

Love and warm espresso-y goodness,
                                                                              Sarah

Sunday, August 7, 2011

Nailed it!


I was snooping around on Pinterest the other night and found some reeeeally cool nail art pictures that I have been dying to try. I swear, doesn't every great idea come in the middle of the night?! Or maybe that's just me. Anyways, I figured a lazy Sunday afternoon would be the perfect time to crack out my inner DIY nail skills...if I have any. I confess, with all the baking, dish washing and gardening I do, I don't usually go all out, especially for nails. But every domestic goddess needs a little funk and glam in her day every now and again ; ) I mean, dishes and cleaning ARE pretty glamorous buuut......


Yeah, nuff said. Get your glamor on. So I've got my goods and I'm ready to go. Bright orange, a vibrant red, a base coat and a clear top coat


Some clear scotch tape and some squiggle scissors. I know, I said nail art not scrapbooking, but stay with me,  it's genius. It's like Martha Stewart goes glam.....minus the pant suit ; ) I started by using the base coat (you can skip this step, it just goes on really smooth and actually lasts) and then a coat of the orange polish


 Apparently this a new product from Revlon, and get this, when it dries and smells like oranges! What the?! Yeah, it's like smelly markers for grown ups! haha, awesome. So I let the orange dry til it was good and hard, (the key/hardest part!) until it started to smell like oranges. THEN, ripped off a piece of tape and cut it using the squiggle scissors. I tried doing it length wise, but found it was easier to work with if you cut it across width wise. 


I decided to cover half of my nail, putting the squiggle part down the center. Press the tape on and make sure the center "seam" is completely stuck down and smooth on the nail. Then for a good swipe of red on the uncovered part. Like I said the key is to make sure the first coat, for my case the orange, is good and dry. I was a little over excited to try the first nail and when I peeled off the tape the orange came with it. : ( Round two. While the red was still wet I carefully peeled off the tape.....


and was left with this! The lines came out a lot more crisp than I had expected


Cut, stuck and painted the rest of my nails and I have to say I am pretty stoked about how they turned out!  Preeetty darn fun. I told James I will probably have to flick on the light in the middle of the night just to re-admire the awesomeness. I think the would look really awesome in a robin's egg blue and black. Or gray and black. Or any other color because they are just that awesome : )

I forgot to mention the man and the moral support behind the whole operation...my handsome husband James. Ok, well he may have been watching Mantracker the whole time, but he WAS there takin' it for the team, inhaling all my toxic nail polish fumes!

So there's my attempt at DIY nail art! There are a lot of fun decals you can purchase for cool nail art, but why pay $10.99 when you can use the nail polish and scotch tape you already have? Genius! You should try it!


Love and nail polish fumes,

Sarah